Unbricking the Netgate pfsense SG-3100

The current process of restoring functionality on the Netgate pfsense SG-3100 router after an unsuccessful firmware upgrade is too difficult (although the device is magnificent otherwise). Today, I experienced the third failed upgrade within six years. Recovery worked every time without problems, but it should be MUCH easier if you want me to recommend this router to my less tech-savvy friends. To pull the recovery off, you need an 8-GB USB stick and USB cable with a high-profile micro-USB connector at one end and a regular USB-A connector at the other. These are the steps that you need to do to unbrick the device:
- Request the firmware image via support.
- Downloading the image (it comes as a compressed .img.gz file)
- Writing the image to an 8 GB USB (who still uses USB sticks?). The software that Netgate recommends is Etcher. Etcher is available for Windows, macOS and Linux (https://etcher.balena.io/#download-etcher). If you are unlucky as I am and the Etcher is dysfunctional on your Linux distro (Suse Tumbleweed), you can erase and write the image to your USB stick manually:
- Uncompress the installation image:
gzip -d /home/user/Downloads/pfSense-plus-Netgate-3100-recovery-23.09-RELEASE-armv7.img.gz - Erase the USB disk (in my case it was /dev/sda):
sudo dd if=/dev/zero of=/dev/sda bs=1M status=progress - Write the image to the USB stick:
sudo dd if=/home/user/Downloads/pfSense-plus-Netgate-3100-recovery-23.09-RELEASE-armv7.img of=/dev/sda bs=4M status=progress
- Uncompress the installation image:
- Have the configuration backed up to an XML file. You need to do this before you brick your device. After writing the image to the USB stick, you should copy the configuration file as "config.xml" to the FAT partition of the USB stick.
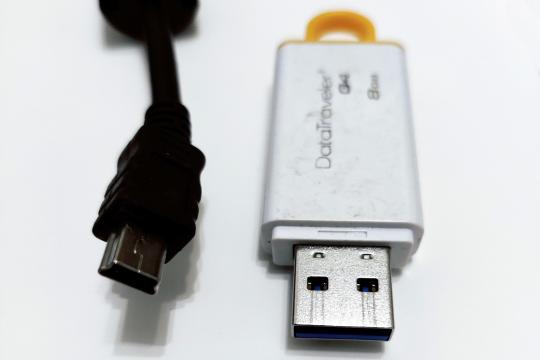
- Finding the (not very common) USB Mini-B (5-pin) cable (see the image)
- Installing a terminal app on the computer and learning how to connect to the device console (https://docs.netgate.com/pfsense/en/latest/solutions/sg-3100/connect-to-...). I use Screen because it works and is installed on most Linux distros by default.
sudo screen -U /dev/ttyUSB0 115200 - Now you need to plug in the USB stick to the USB port on the back of the device and unplug and replug the device to reboot. Immediately in the beginning, you need to stop the boot process by quickly pressing any key.
- You execute "run recovery" and follow the instructions. It will ask you where to install the image, but I had only one option, so there was nothing to choose from. The restoration can take a while.
- After the installation, remove the USB stick and unplug/replug to power-cycle.
- Despite the config.xml file, my router reverted to the default password "admin"/"pfsense".
This process is too convoluted and time-consuming. Especially since the restore image is not easily downloadable. Instead, you have to ask for the current image from Netgate's support. Yes, you can restore to an old image, but then you need to upgrade the hell out of the device, which is not good for eMMC memory. While listening to SecurityNow I learned that the SG-3100 uses eMMC memory, which has a rather short lifetime. I tested my memory, and it claims it still has about 50% lifetime left (that would be still more than 6 years. But I am anyway looking at replacing the device either with a Protectli or a FRITZ!Box.


